Expert User Guide
Welcome to the user guide for Thal's Expert Tool for Final Fantasy XIV!
Expert gives you step-by-step instructions to get the highest possible chance of successfully crafting an item (even non-experts!) for a character level 70 or higher. Expert uses conditions to give you better results, typically double the quality of a macro.
Craft Your Item
The price of using conditions is that you'll be frequently switching between the game and the site. Make your first try easier by choosing an item with no time pressure, and then begin:
1. Enter Player Stats
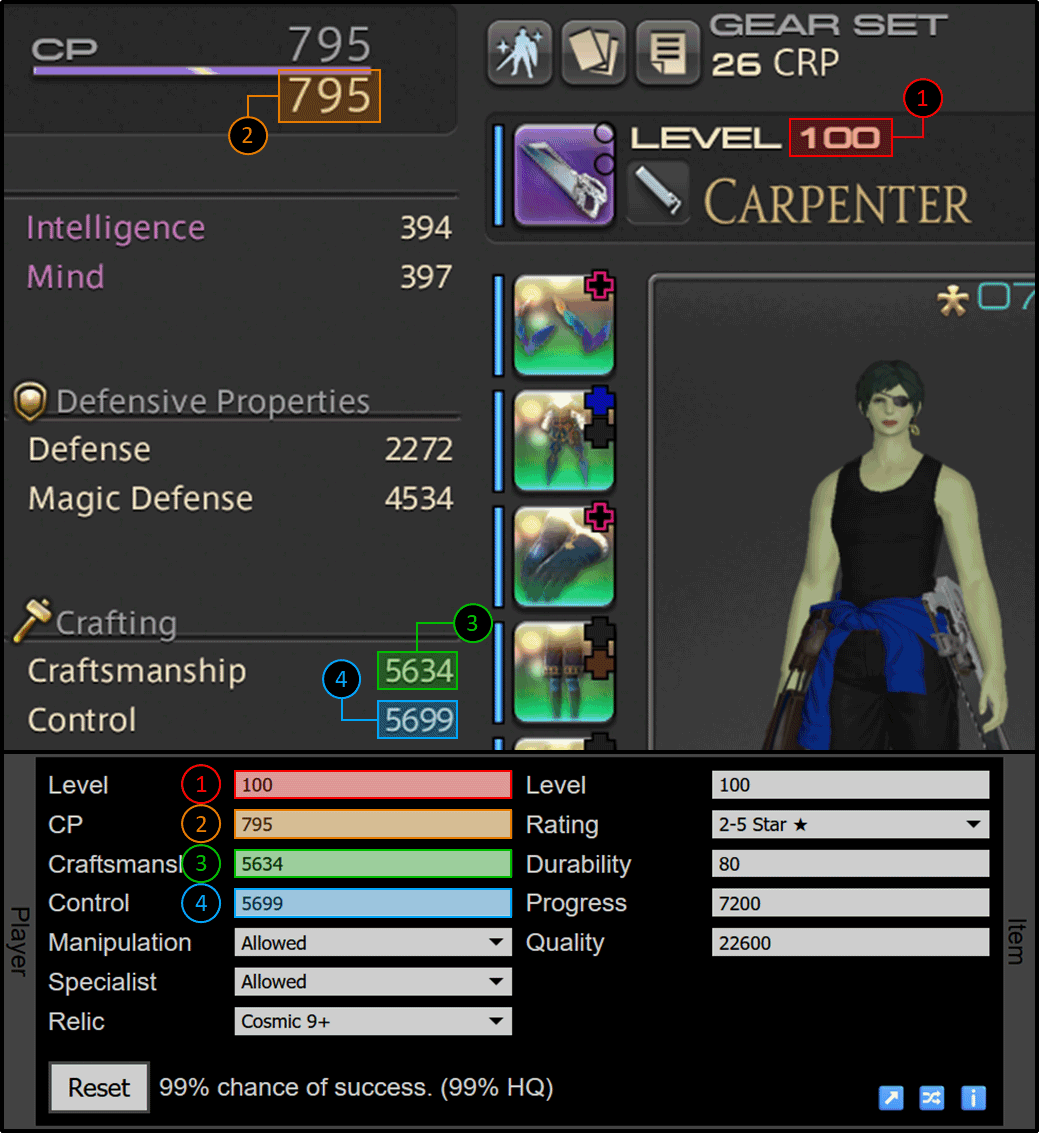
Open your character sheet in the game and copy your level, cp, craftsmanship, and control values into Expert's Player panel. It is easiest to use desired food and medicine first and copy the buffed values. But if you want to save gil, you can do simple math in the text boxes, such as "656+100+27" for 656 base cp with food and medicine cp buffs added.
Then, check the following options:
- Manipulation is unlocked by completing the level 65 class quest for your current class. It is worth the trouble, particularly for items with 40 or fewer durability, so the option defaults to "Allowed". But if you haven't unlocked it yet, change it to "Not Allowed".
- Specialist actions are unlocked by equipping a Soul of the Crafter (note: this changes your cp, craftsmanship, and control). These actions will improve your chance of success, but require consuming a Crafter's Delineation from your inventory for every action. The default is "Not Allowed", change it to "Allowed" if you want specialist actions.
- Relic means a mainhand with a special crafting buff that is more than just stats. For example, Phase 9 and above Cosmic and Splendorous relics both provide 1.75x quality during Good condition, compared to the usual 1.5x. Use "Cosmic 9+" for these, and for all other mainhands (including Phase 1-8 Cosmic relics) use "None".
Note that Optimo does not have the Relic setting. If you used the Switch 🔀️ button to get here from Optimo, be sure to set Relic manually.
2. Enter Item Stats
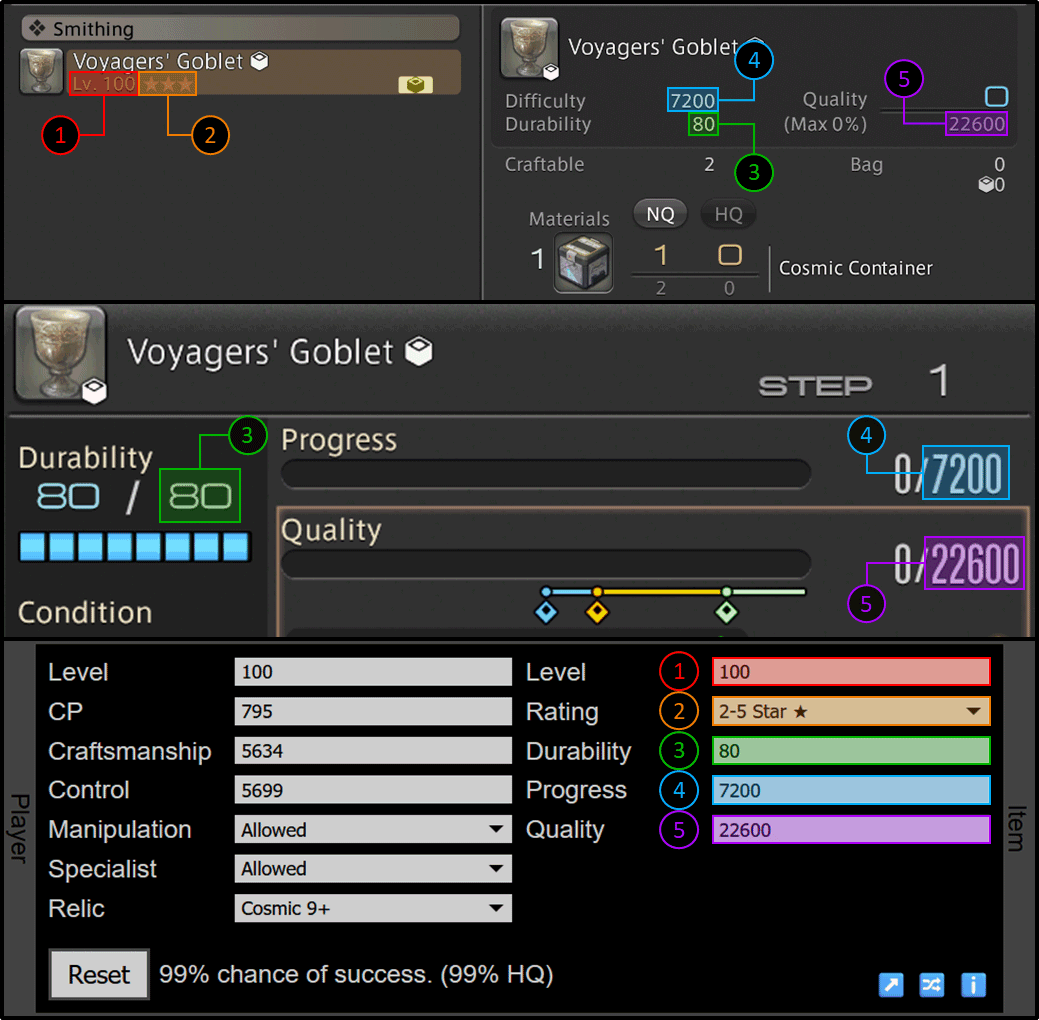
Open the crafting log in the game and copy the item level, rating, durability, maximum progress (sometimes called difficulty), and requested quality into Expert's Item panel. Requested quality should be the item's maximum quality, subtracting any quality granted by HQ materials. You can do this subtraction in the text box (e.g. "21200-5194").
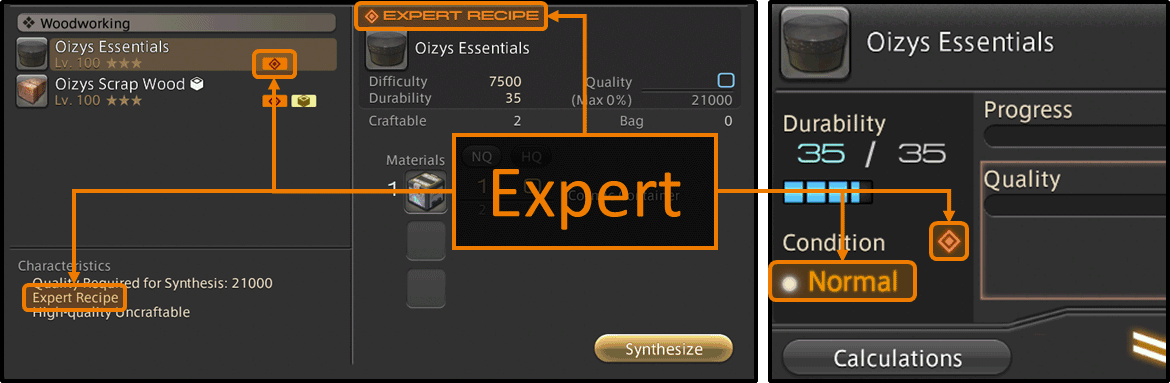
Item rating is either the number of stars next to the item level (can be any number from zero to five), or "Expert" if there is an orange bar with double red diamond nearby. The rating, along with the item and player levels, determines how much progress and quality each action generates. Double check these values if in-game progress and quality are different than expected.

Then, check the following options (if available):
- For certain items in Cosmic Exploration, a Stellar setting will appear controlling the use of stellar actions. The default "Auto" will only use them where recommended, but this can be overriden with "Allowed" or "Not Allowed". If the Stellar action is no longer available because it was already used this mission, be sure to select "Not Allowed".
3. Click Start and Follow Instructions
Click the Start button and Expert will calculate your chance of success to within one percent accuracy and give you a set of instructions in the Steps panel. Start the craft in-game and follow along:
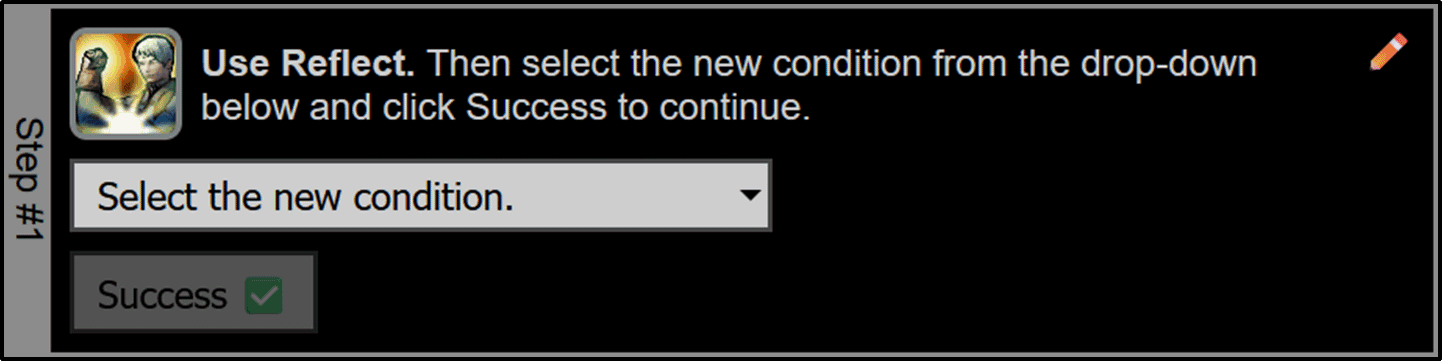
- Perform the recommended action in-game.
- Select the new in-game condition from the dropdown on the site. If you have a keyboard, it is fastest to press the first letter of the dropdown choice as a shortcut (e.g. L is used for "L - Pliant").
- If the action succeeded, click Success. Some actions, like Rapid Synthesis and Hasty Touch, can fail. If that happens, click Failure instead. If you have a keyboard, it is fastest to press Tab once to select Success or twice to select Failure, then press Enter to click the appropriate button.
Continue following these instructions until the craft is completed.
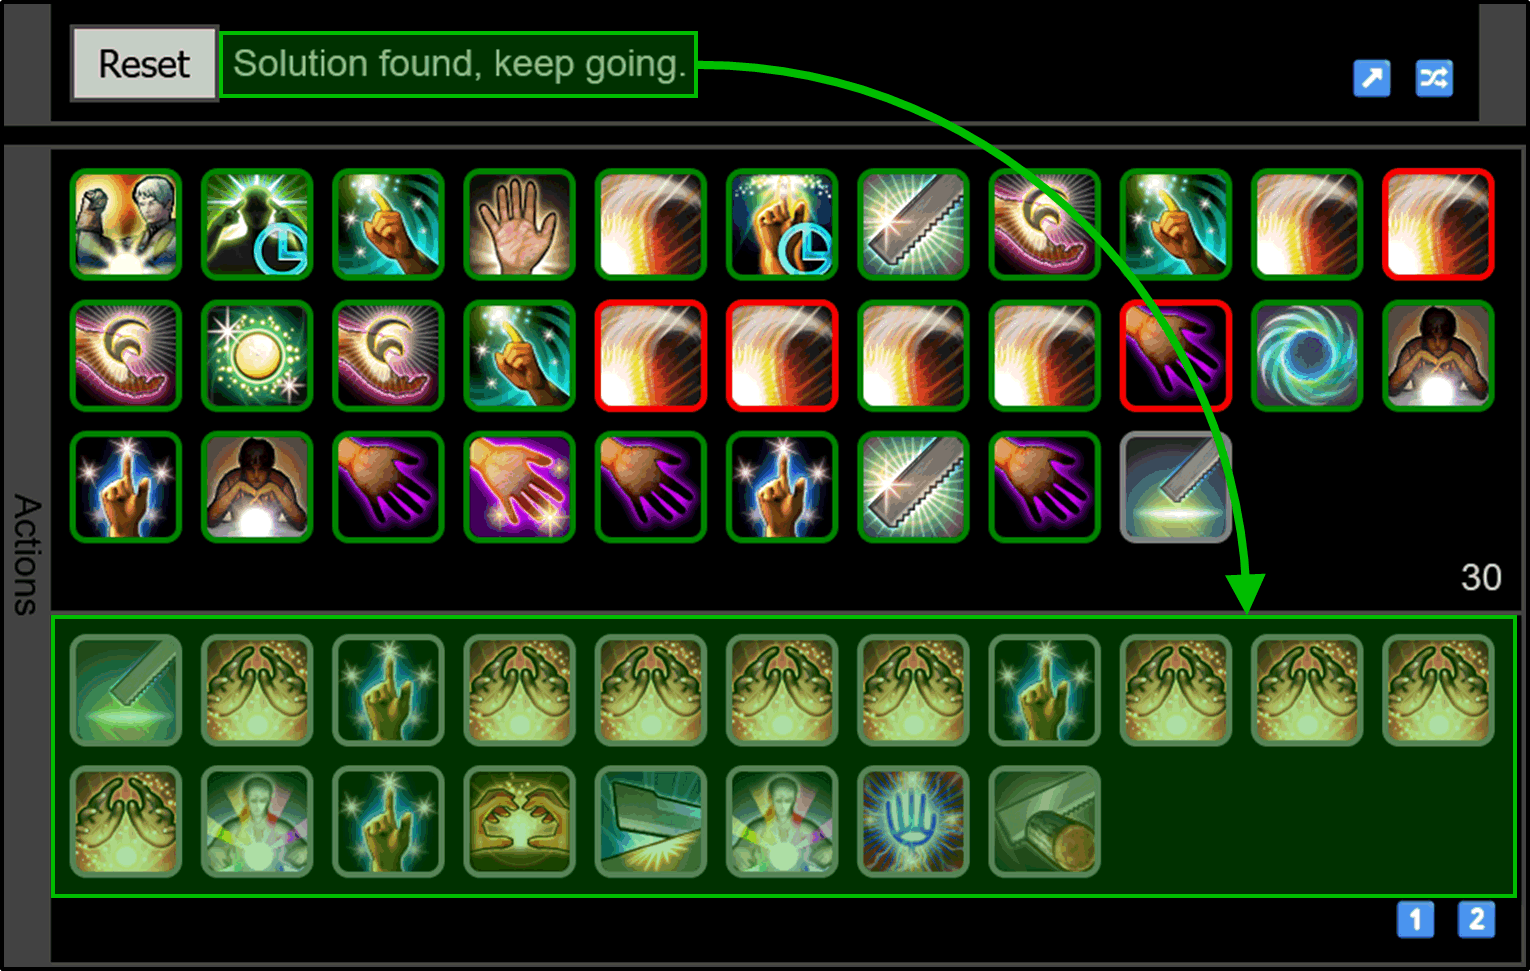
If you are fortunate, the chance of success message will change to "Solution found, keep going." This means Expert has found a sequence of actions, shown at the bottom half of the Actions panel, that achieve the requested quality regardless of conditions. When you see this, you can stop following the usual instructions and simply perform these actions in-game as you would a macro.
4. Complete
Now your craft is complete! Note that your stats are saved periodically in the URL field of your browser, so you can bookmark them for later use.
Troubleshooting
A. Mistakes
Mistakes are inevitable, but you can edit your stats or actions at any time. To edit an action, look for the Edit ✏️ button nearby. You can change the action used, the condition, or whether it was a success or failure.
The longer a mistake stays in, the harder it is to fix. Every few actions, you should compare the Results panel on the site with the results in-game. Progress, quality, cp, durability, and buffs should always agree.
If you notice a difference, first try checking your stats:
- Does your gear need repairing? Broken gear does not contribute its stats.
- Did you use food or medicine? If your player stats included food or medicine when you entered them, those specific buffs must be active when you craft. Medicine is easy to forget: it only lasts 15 minutes and consuming multiple doses does not stack.
- Did you use the proper item rating? Rating is either the number of stars next to the item level (can be any number from zero to five), or "Expert" if there is an orange bar with double red diamond nearby.
- If you set Specialist to "Allowed", do you have a supply of Crafter's Delineation items in your inventory? Saddlebag or retainers do not count.
If the stats agree but the results don't, check the actions:
- If only progress differs, make sure you entered Success or Failure correctly for Rapid Synthesis.
- If only quality differs, make sure you entered Success or Failure correctly for Hasty Touch and check the Relic option.
B. Chance of Success
Keep an eye on the chance of success located next to the Start button. While it can give you heartburn, it can also give you useful information:
- If the chance of success is missing, that means Expert cannot determine the conditions from the item stats. Make sure the item stats are correct.
- The first chance of success after clicking Start has roughly one percent accuracy. For performance, all subsequent chances only have three percent accuracy. Don't get too worried about small shifts.
- "Solver is panicking." This means Expert will not be able to reach the requested quality on its current course. Instead, Expert sets up the highest chance of Byregot's Blessing under Good condition and hopes for the best.
- "Solution found, keep going." This means Expert has found a sequence of actions, shown at the bottom half of the Actions panel, that achieve the requested quality regardless of conditions. When you see this, you can stop following the usual instructions and simply perform these actions in-game as you would a macro. Note that items with Poor condition (i.e. any rating other than "Expert") will rarely show this message before Byregot's Blessing.
C. Increasing Your Chances
There are a variety of ways to spend gil to increase your chance of success. Use Expert before you buy anything to see if the increased chance is worth the expense.
Your stat priority should be cp >>> control > craftsmanship, with the caveat that many items have a minimum required craftsmanship.
- Use food and medicine. The best food and medicine for your level will roughly increase your cp by ~20%, resulting in even larger gains in quality.
- Use specialist actions. Try Specialist "Allowed" to see if that helps. If it does, equip a Soul of the Crafter (note: this changes your cp, craftsmanship, and control) and put a supply of Crafter's Delineation items in your inventory.
- Get the best gear and meld it as well as you can afford. Making your own crafted gear is a fun rite of passage for new crafters, and if you don't mind gathering, it's essentially free. If you have 5-10 million gil, a full pentameld is absolutely worth doing. But if you don't, you can get much of the benefit just by capping every item with the most cp it can support. Use Craftsman's Cunning XII (or similar) to keep costs below 50k, you will not need the more expensive Craftsman's Cunning XI, since you are doing at most one overmeld per item.
D. Material Miracle
Certain items in Cosmic Exploration have the Material Miracle action. Material Miracle uses a timer instead of a number of actions, so it is not included in the recommendations or the chance of success calculation. Save Material Miracle only for the most difficult crafts, and use it while building progress near 30 durability (it will change the condition). This will give you multiple chances to get a Pliant condition and build durability before you need it.
Do It Yourself!
Expert is meant to teach you how to do difficult crafts yourself, so that eventually you won't need to use it anymore. This cuts down on a couple minutes of switching between the game and the site, which is vital for the new timed crafts. It will take practice, but here's how to get started:
Know Your Conditions
Items that are "Expert"-rated have a special set of conditions, so it will help to familiarize yourself with them. Not every "Expert" has every condition. Pay particular attention to whether your item has Pliant. If it's missing, that means Primed Manipulation will be your only condition-based bonus to durability generation.
- Normal. Nothing special.
- Good. Generates 1.5x quality (1.75x with relic). Recommended actions: Tricks of the Trade (+20 cp) is best, Precise Touch (150% quality, extra Inner Quiet) is also good.
- Good Omen. Good is next turn. Recommended actions: Innovation or Great Strides to take advantage next turn.
- Centered. Increases action success chance by 25%. Recommended actions: Rapid Synthesis, Daring Touch, or Hasty Touch.
- Sturdy or Robust. Durability cost is halved (rounds up). Robust also means Sturdy is next turn. Recommended actions: Rapid Synthesis, Advanced Touch if Observe was used last, Daring Touch, or Hasty Touch.
- Pliant. CP cost is halved (rounded up). Recommended actions: Immaculate Mend, Manipulation, or Master's Mend if those make sense for the situation, otherwise use anything useful that costs cp. For example, Advanced Touch if Observe was used last, any buffs you might need, Trained Finesse, or Prudent Touch.
- Malleable. Generates 1.5x progress. Recommended action: Rapid Synthesis.
- Primed. Adds two steps to buffs. Recommended actions: use a buff if it makes sense. Pliant is better for Manipulation, but it can work with Primed if you need it.
Items that are not "Expert"-rated have the usual conditions:
- Normal. Nothing special.
- Good. Generates 1.5x quality (1.75x with relic). Recommended actions: Tricks of the Trade (+20 cp) is best, Precise Touch (150% quality, extra Inner Quiet) is also good.
- Excellent. Generates 4x quality. Recommended actions: Precise Touch (or Byregot's Blessing if it would finish).
- Poor. Generates 0.5x quality. Always follows Excellent condition. Recommended actions: avoid quality.
General Strategy
On difficult crafts, it is critically important that you count your cp. Success or failure are frequently 7 cp apart. Generate progress first, so that you know exactly what resources you have when it's time to generate quality.
If you can't macro a craft, then you need non-Normal conditions to get the job done. The more conditions, the better. Go slow! Spend cp and durability slowly and ideally only when conditions make it beneficial to do so. Use Innovation > Observe > Advanced Touch > Observe > Advanced Touch as your rotation when there is nothing to do. Pure Observe spam is worse at taking advantage of conditions.
For your finisher, you should use Trained Perfection > Great Strides > Innovation > Preparatory Touch > Great Strides > Byregot's Blessing > Basic Synthesis. This finisher requires 146 cp and 11 durability. Determine how much quality this is for your stats at maximum Inner Quiet, you will need this number later. There are many other finishers, but in a timed scenario, not having to calculate anything is best.
Let's Craft
- Get progress up, biasing towards Veneration and Rapid Synthesis. You can still use conditions for other purposes, but focus mostly on progress. You want to end one Basic Synthesis away from finishing the craft. Final Appraisal helps here if you want to act quickly without calculating.
- Build stacks of Inner Quiet (+10% quality per stack). Bias towards Precise Touch a little, even though Tricks of the Trade is better (remember: go slow!). Innovation > Observe > Advanced Touch > Observe > Advanced Touch should be your rotation, deviating only when a condition tells you or you are running out of durability.
- Build quality. Keep doing your rotation and condition actions until you are within your finisher's quality of the end. You will need 146 cp and 11 durability, don't overspend. But also don't generate durability you won't use. Near the end, that 96 cp for Manipulation might have been better as three Trained Finesse.
- Finish. If you have enough quality, cp, and durability, do your finisher. If you don't, keep doing your rotation until you get to 88 cp and 11 durability. Now your finisher becomes Innovation > Great Strides > [optional Observe] > [optional Observe] > Byregot's Blessing. Your goal is to get a Good condition on Byregot's Blessing, using Observe to get more chances. A Good Byregot's Blessing with Great Strides and Innovation active generates slightly more quality than the usual finisher.
Specialist Actions
If you are crafting with Specialist "Allowed", equip a Soul of the Crafter (note: this changes your cp, craftsmanship, and control), put a supply of Crafter's Delineation items in your inventory, and try the following specialist actions:
- Heart and Soul. Allows skills that require Good or Excellent condition to work without them. Use it, and then when no better action is available, take a free Tricks of the Trade (+20 cp).
- Quick Innovation. Gives one turn of Innovation without changing condition. Only works if Innovation is not up already. Save it for situations where you need Good Byregot's Blessing, so that the required 88 cp is lowered to just 70. Use Great Strides, Observe until Good appears, and then use Quick Innovation and Byregot's Blessing.
- Careful Observation. Changes condition without changing buffs so you can add three more Observe-like chances to get Good Byregot's Blessing without costing any cp.
Final Thoughts
With practice, you should be as accurate as the Expert Tool but since you won't be switching between the game and the site, you will be a couple minutes faster.
If you want even more speed, you may want to consider suboptimal actions, such as using Immaculate Mend even on Normal condition, or using unbuffed Precise Touch instead of Tricks of the Trade on Good. These are fine if your success chance is well above 95%, but when you start doing harder crafts, remember that these are bad habits and come back to the Expert Tool for a success-maximizing tune-up.